Team
Inviting people, giving them roles, opening a member's page, and deactivating or removing access.
The Team tab is where people are invited to the workspace and given what they may do in it. What a person may do is expressed as roles — a role is a named set of permissions, assigned to a property or to the whole workspace. The roles themselves are built on the Roles tab; this page is about handing them to people.
The tab is open to the workspace's owner and admins, and to anyone whose role includes Sees the team — a property manager, typically — who then sees only the people with access to their own property. A banner at the top says so: "You see the people with access to “Riverside Lisboa Hotel”. Their roles in other properties are not shown."
The table
- 1
- 2
- 3
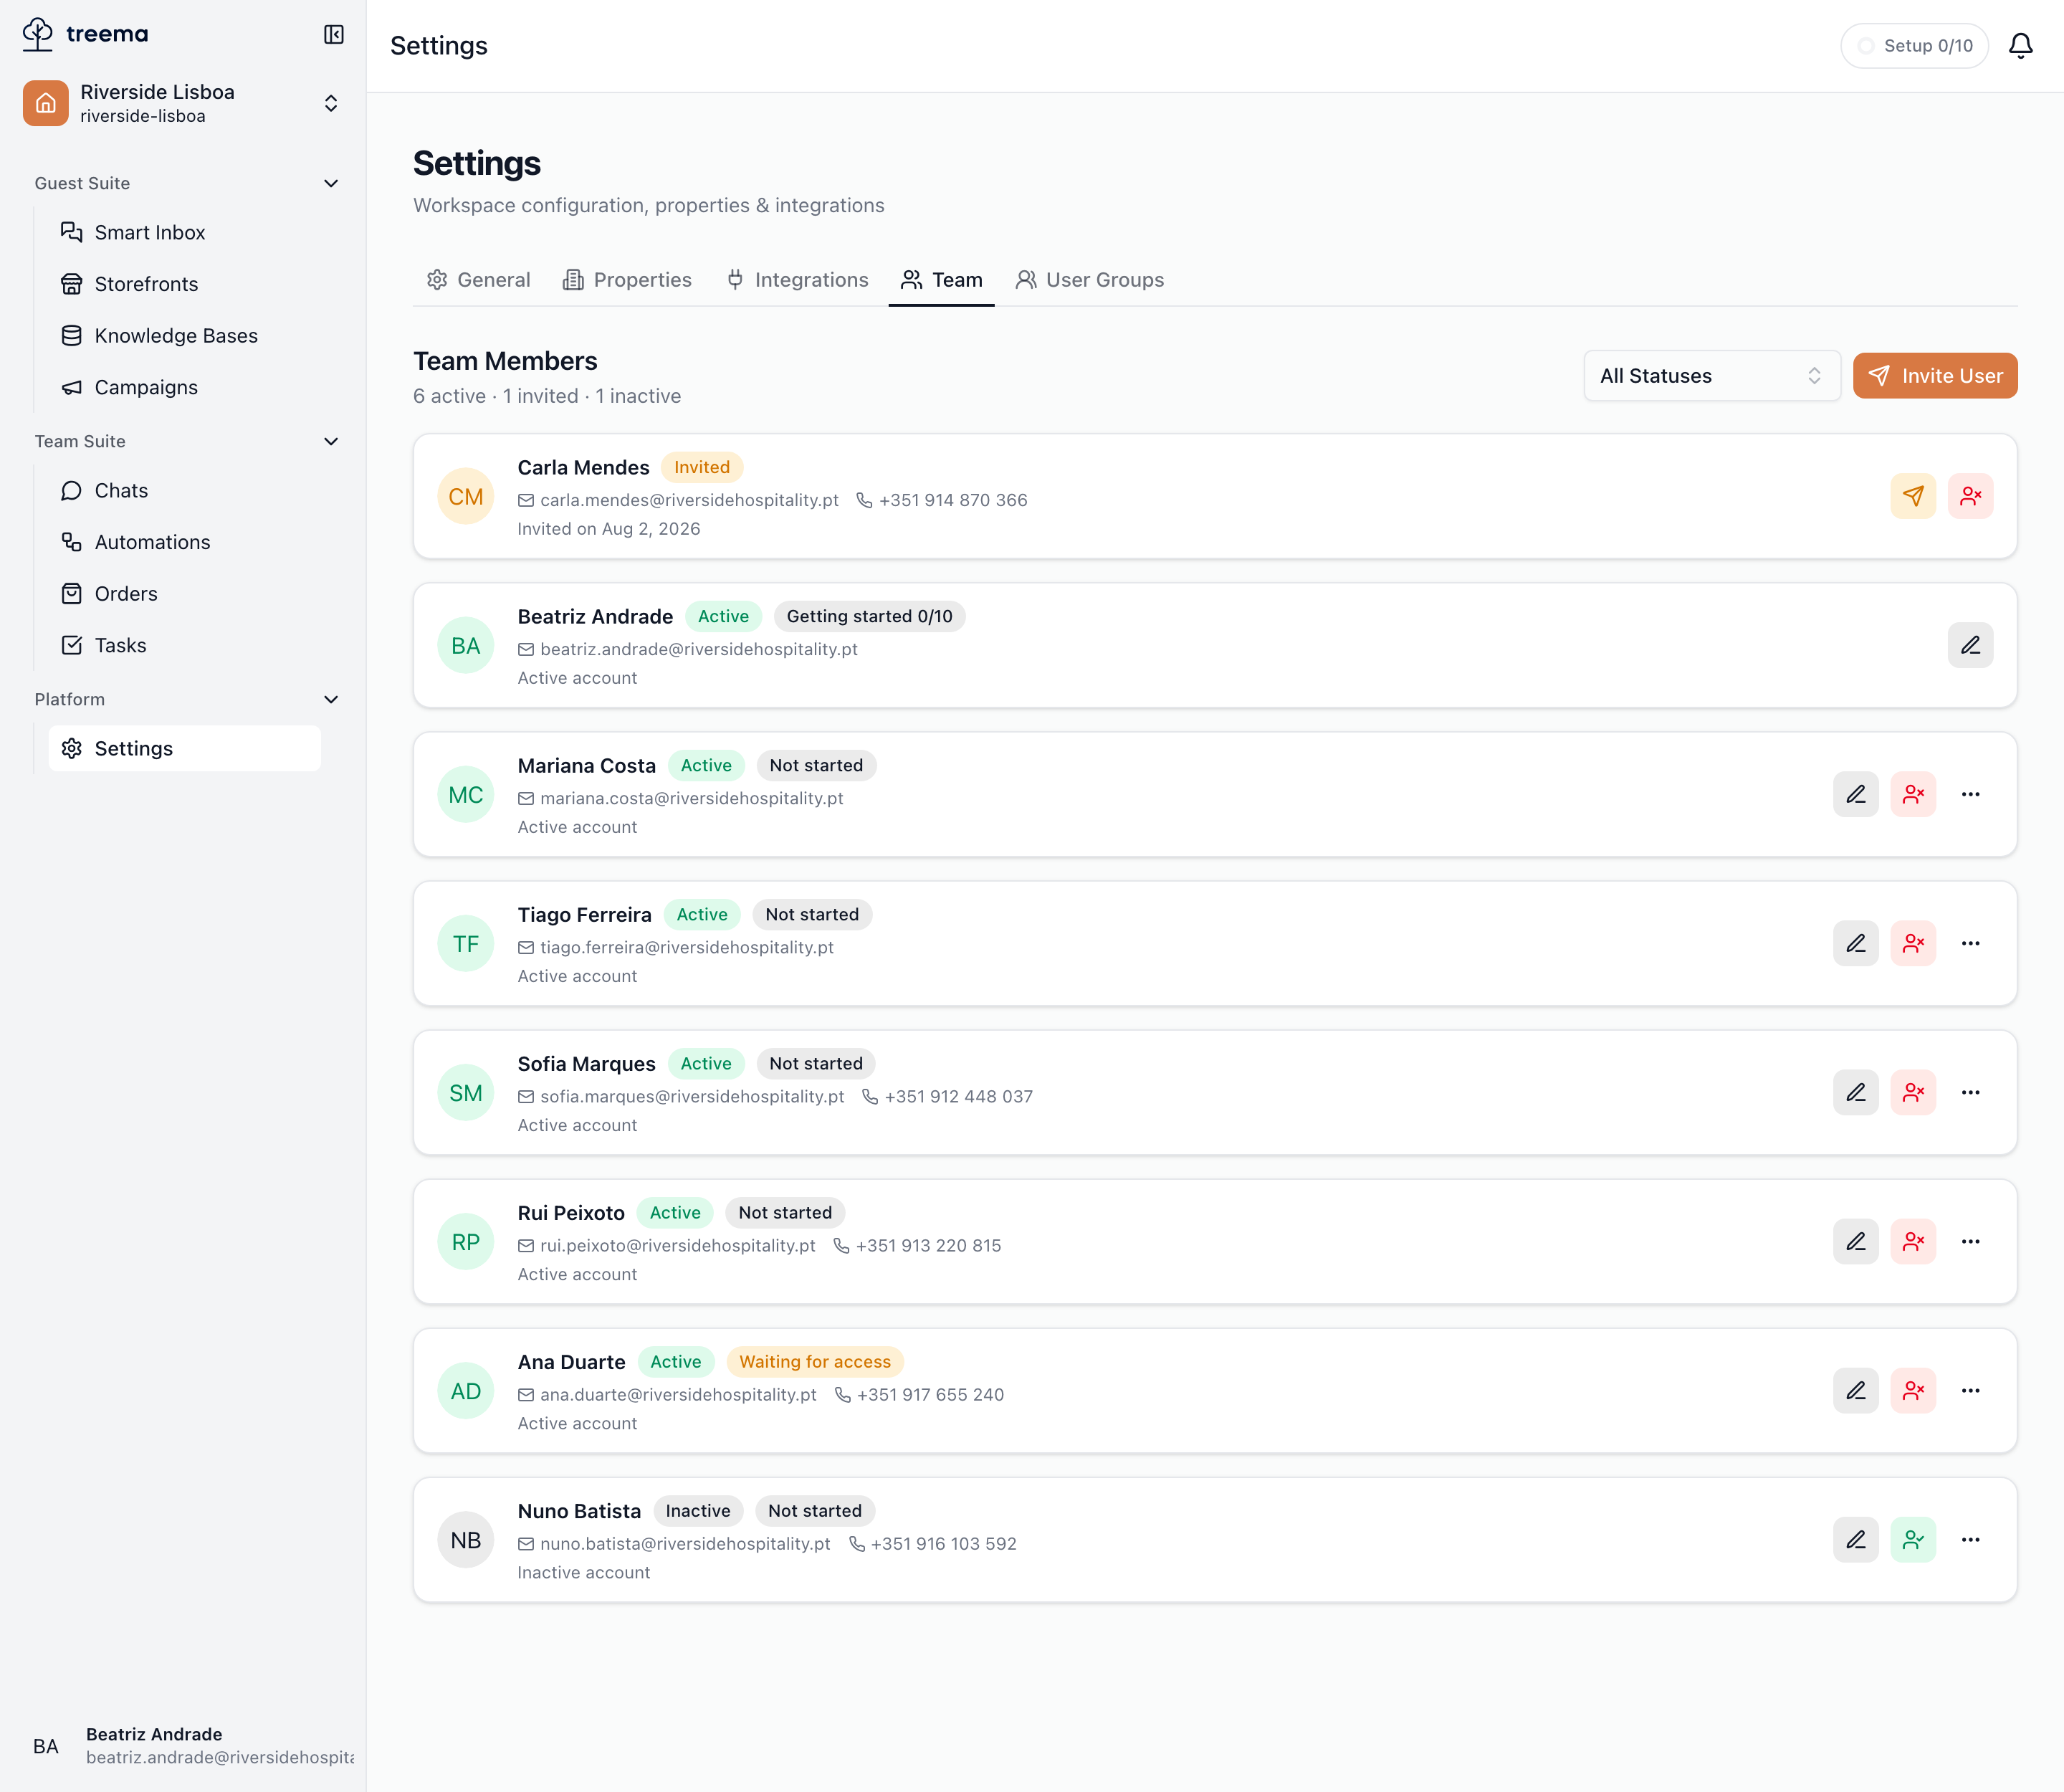
- Headcount by status, the Change log, and Invite
- A pending invitation — its row opens the same page as a member’s
- A deactivated account — open it to bring it back
The tab is headed "Team" with a running count underneath — "n active · n invited · n deactivated". Beside it are the Change log button, which opens the access change log, and Invite.
Under that, a search box ("Search by name or email") and three filter chips — Property: all, Role: any, Status: any (Active, Invited, Deactivated). Reset appears once any of them is set. The chips filter the table as you set them; "Nobody found. Change the filters." is the empty result.
Each row is one person:
| Column | What it shows |
|---|---|
| Member | Name and email. Your own row carries a You pill. |
| Property roles | One chip per role, as Role · Property — "Front desk · Riverside Lisboa Hotel". A role that applies everywhere reads Role · All properties. The owner's and admins' rows say Owner · full access / Admin · full access instead, because they hold no roles: full access needs none. |
| Workspace roles | The roles that apply at workspace level. Only owners and admins see this column. |
| Status | Active, Invited or Deactivated. |
| Changed | The date of the last role change and who made it — "System" for a grant no person made. |
A property manager sees, in the roles column, only what the person holds in the manager's own properties; anything else is folded into "+n in other properties".
Clicking a row — or the chevron at its end — opens the person's page, described below.
Inviting someone
Invite opens "Invite to the team" — "The link goes out by email and is valid for 48 hours." It walks through three steps: Who, Access, Review, with "Step n of 3" in the footer and Next to move on. The same dialog is offered on the workspace's Home page as Invite team.
1 · Who
- 1
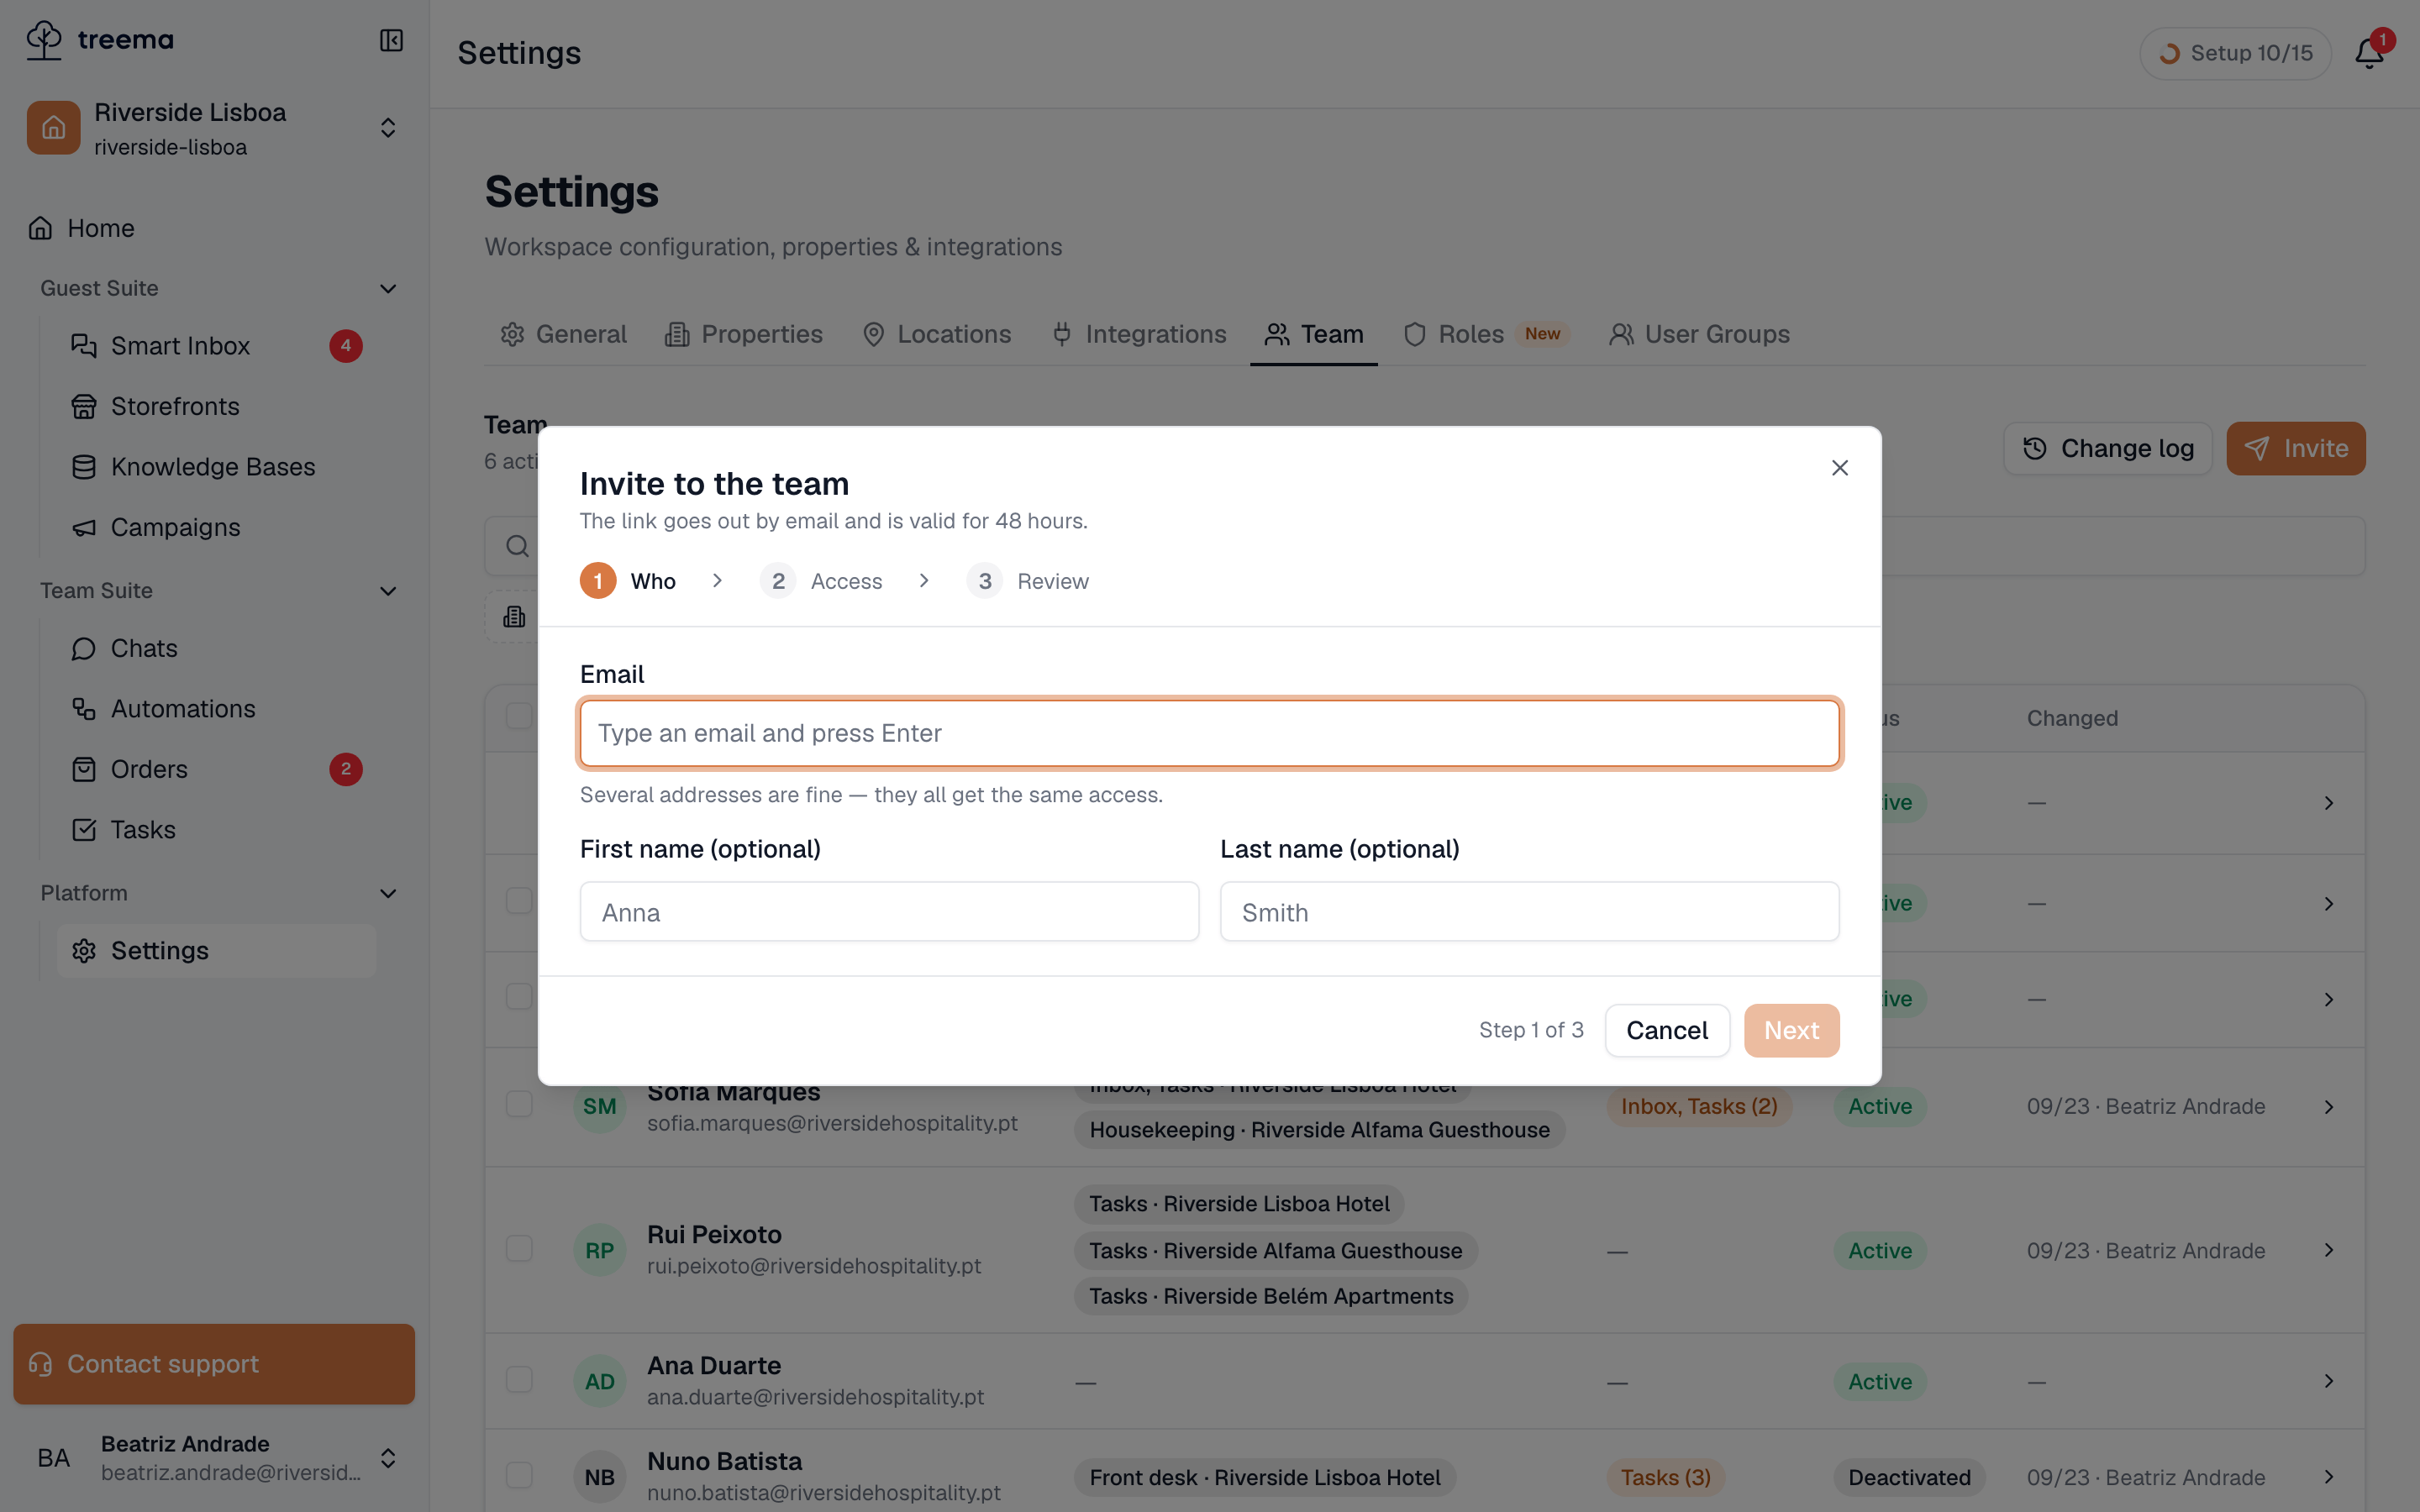
- Email addresses as chips, then an optional first and last name
Email — "Type an email and press Enter". Each address becomes a chip, and you can add several: "Several addresses are fine — they all get the same access." First name and Last name are optional; the person fills them in when they accept.
2 · Access
- 1
- 2
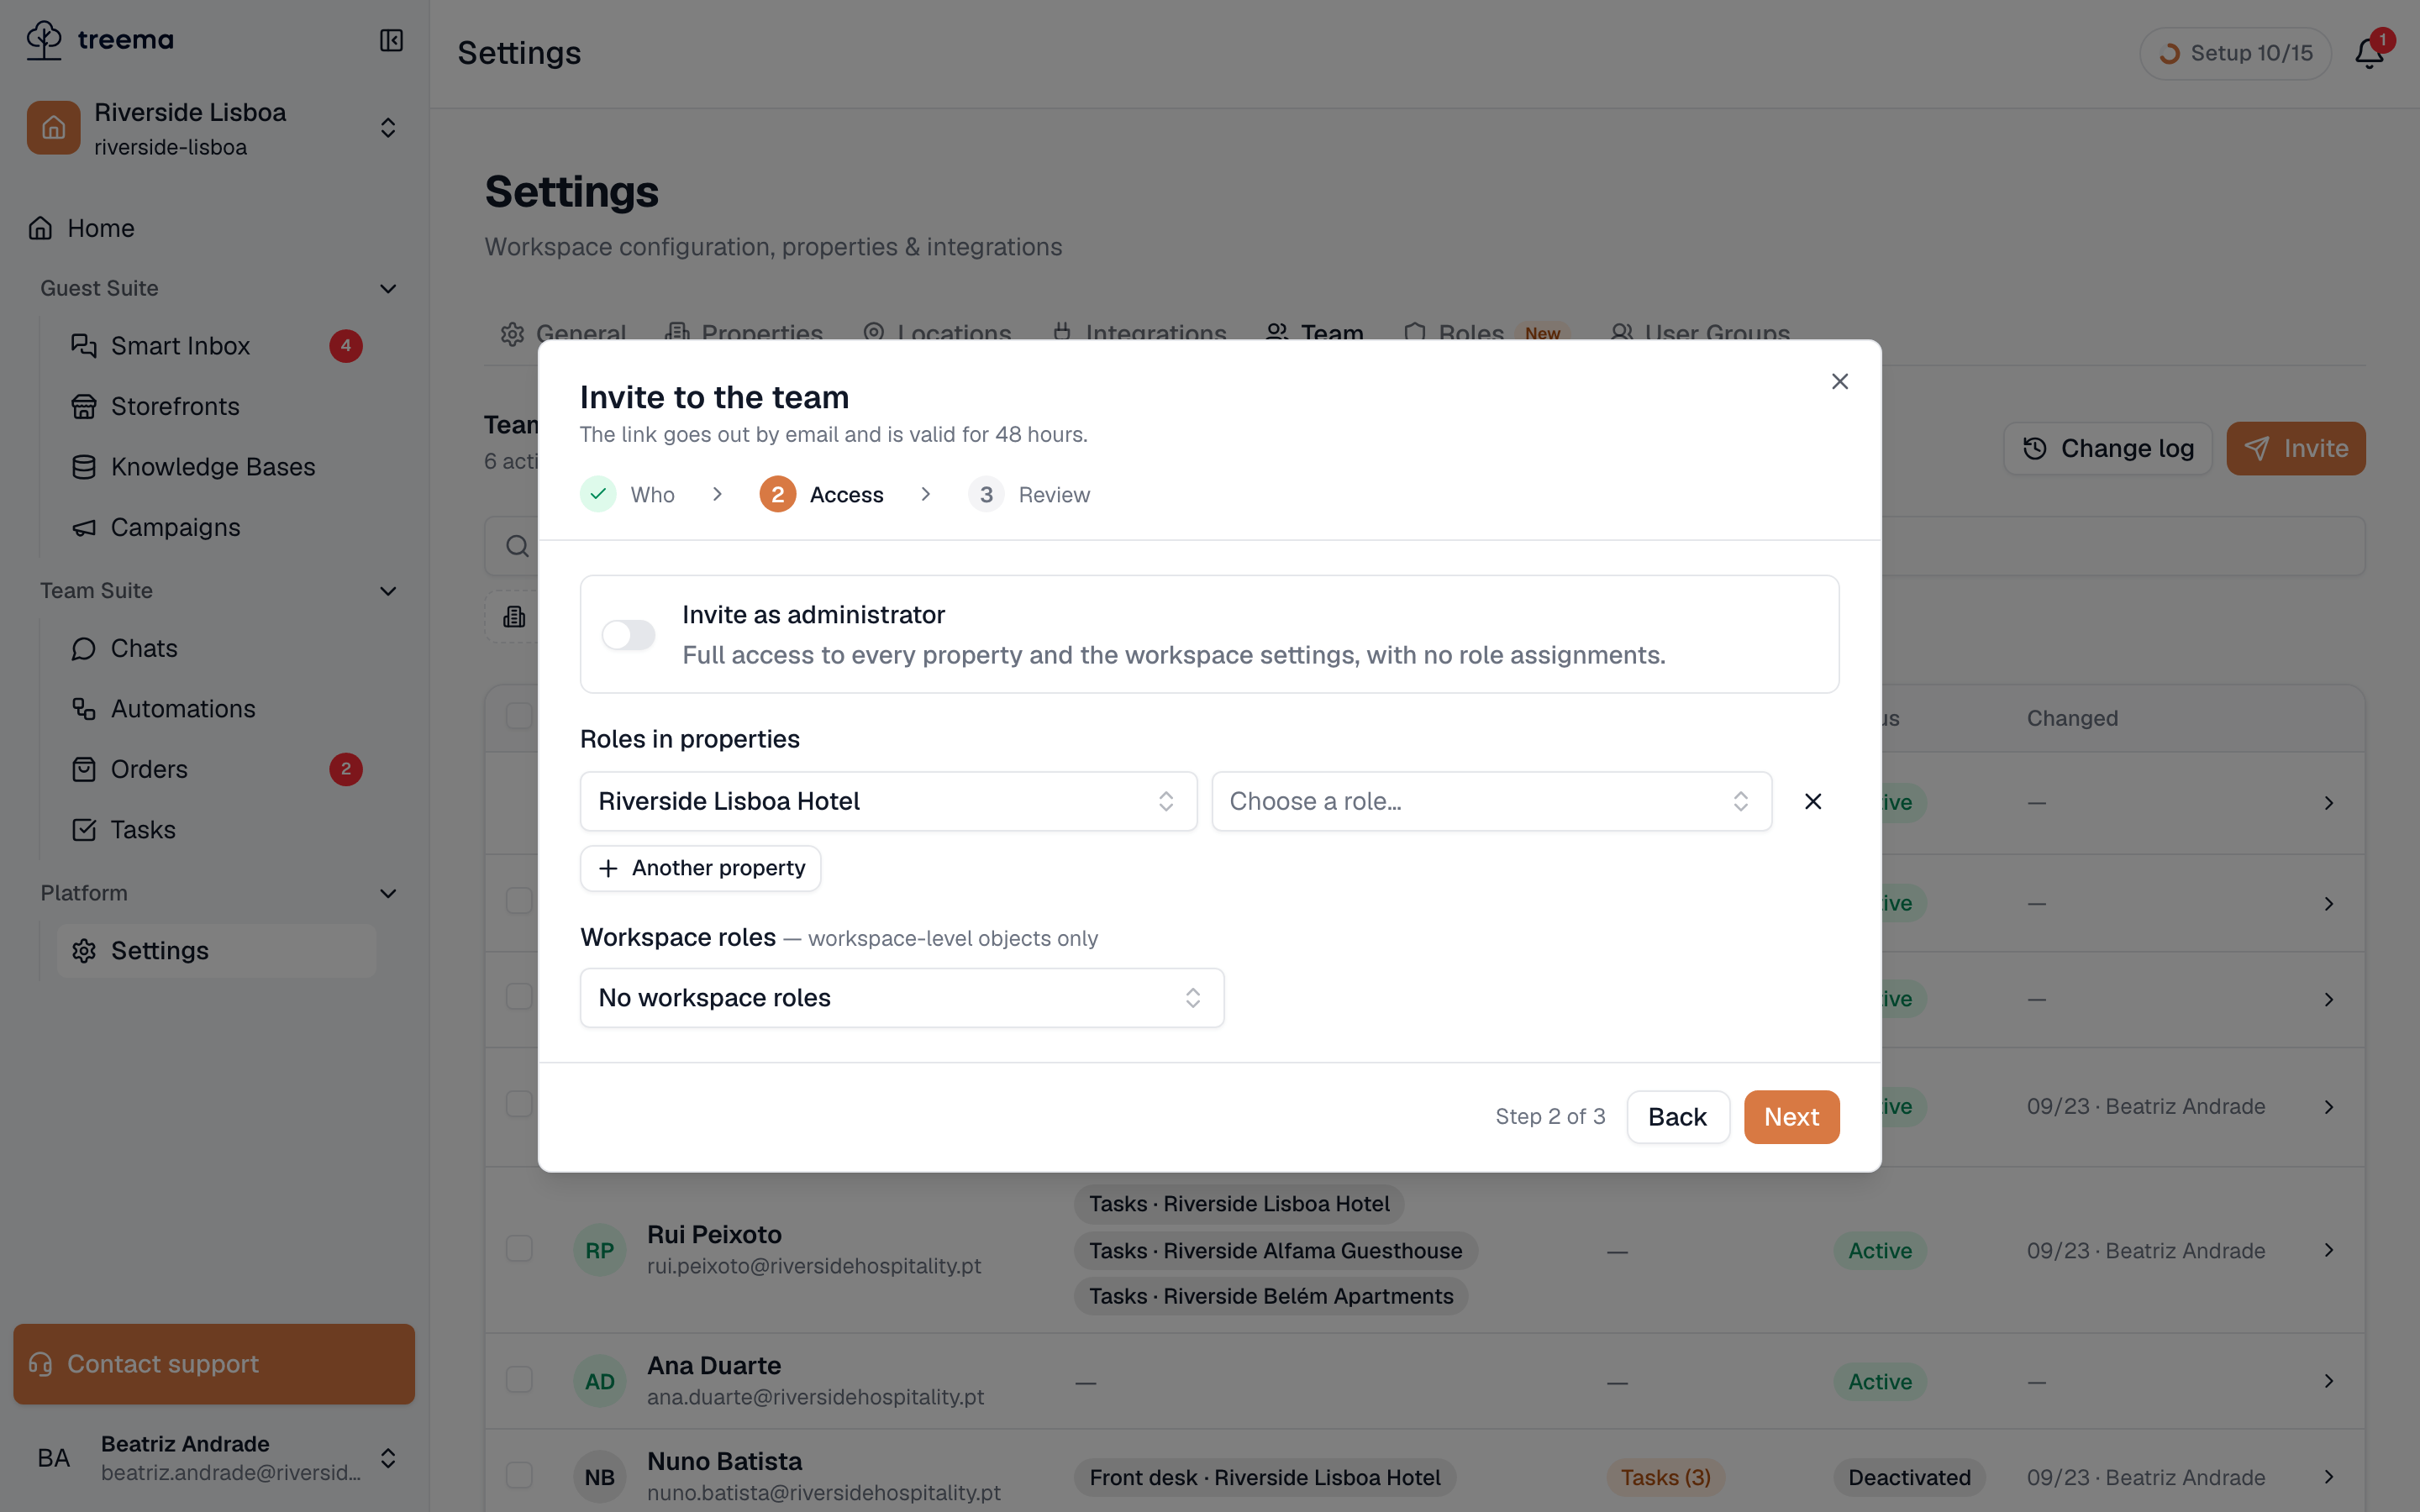
- Invite as administrator — full access, no roles to choose
- Roles in properties — one row per property, a role in each
Roles in properties is a list of rows, each a property and the role the person gets there. The first row is ready; Another property adds one, the cross removes one. The role picker offers the presets and the custom roles that fit that property — "Front desk", "Housekeeping", your own.
If you are the workspace's owner or an admin, two more things are here:
- Workspace roles — "workspace-level objects only": a role for things that belong to the workspace rather than to a property, such as its storefront or channels. No workspace roles is the default.
- Invite as administrator — "Full access to every property and the workspace settings, with no role assignments." Turning it on hides the rows: an administrator needs none.
A property manager sees the rows alone, with a note: "Workspace roles and “all properties” aren’t available here: a workspace administrator grants them."
Next insists on at least one role — "Add at least one role — otherwise this person cannot open anything." — and on a role in every row.
3 · Review
- 1
- 2
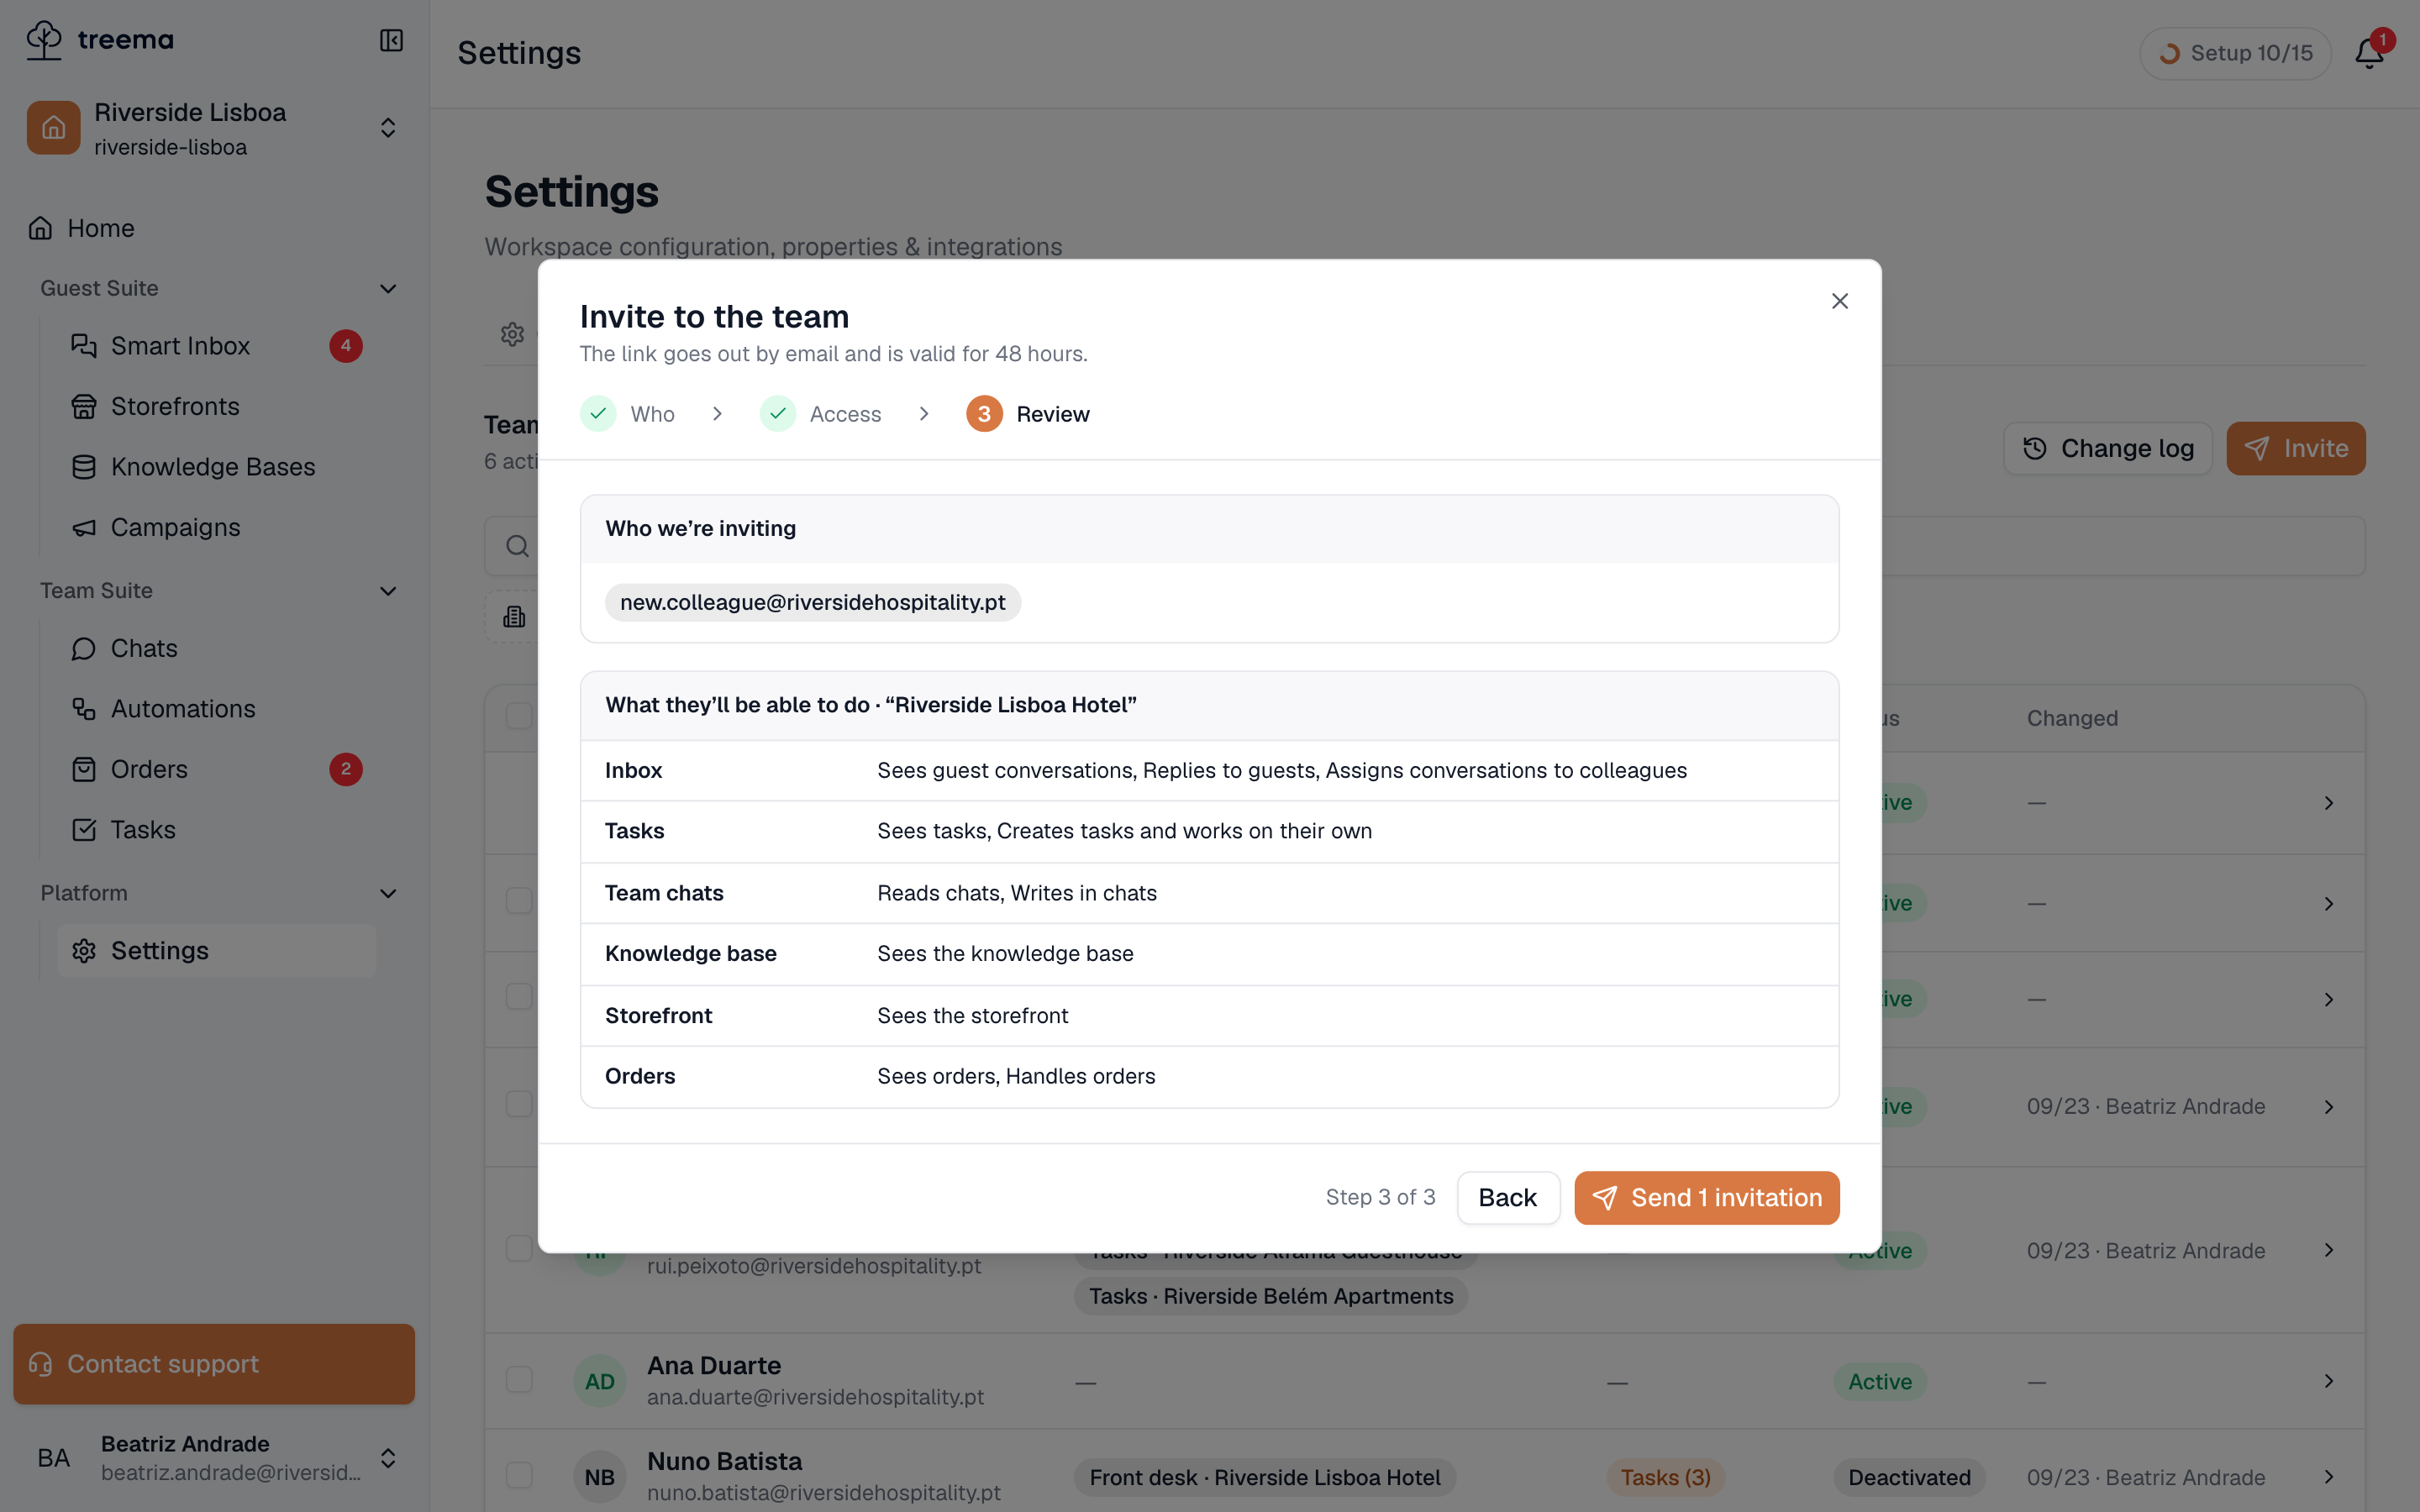
- Who we’re inviting — every address, and after sending whether it went out
- What they’ll be able to do — per property, module by module, sensitive permissions marked
The review shows Who we’re inviting — the addresses — and then, per property, What they’ll be able to do · “Property”: every module the chosen roles cover, with the permissions listed by name and the sensitive ones marked with a warning sign. A workspace role appears under At workspace level; an administrator invitation simply says Administrator — "Full access to every property and the workspace settings."
Send n invitations sends the emails and closes the dialog. If an address cannot be invited, the dialog stays open with that chip marked "not sent" and the reason under it — "This person is already in the workspace." or "This person already has a pending invitation." — while the others are marked "sent"; fix the address and send again, only the unsent ones go out.
A person's page
Every row opens a page of its own, at Settings → Team → the person's name. The header has their name, email and phone, and three badges: the status, their level (Owner, Administrator or Member) and, for a member who has accepted, how far they have got with their Getting Started checklist (see Tracking who has actually started). The actions on the right depend on who you are looking at — Deactivate or Activate for a member, Resend and Revoke invitation for someone who has not accepted yet.
Three tabs follow: Access, Profile and History.
Access
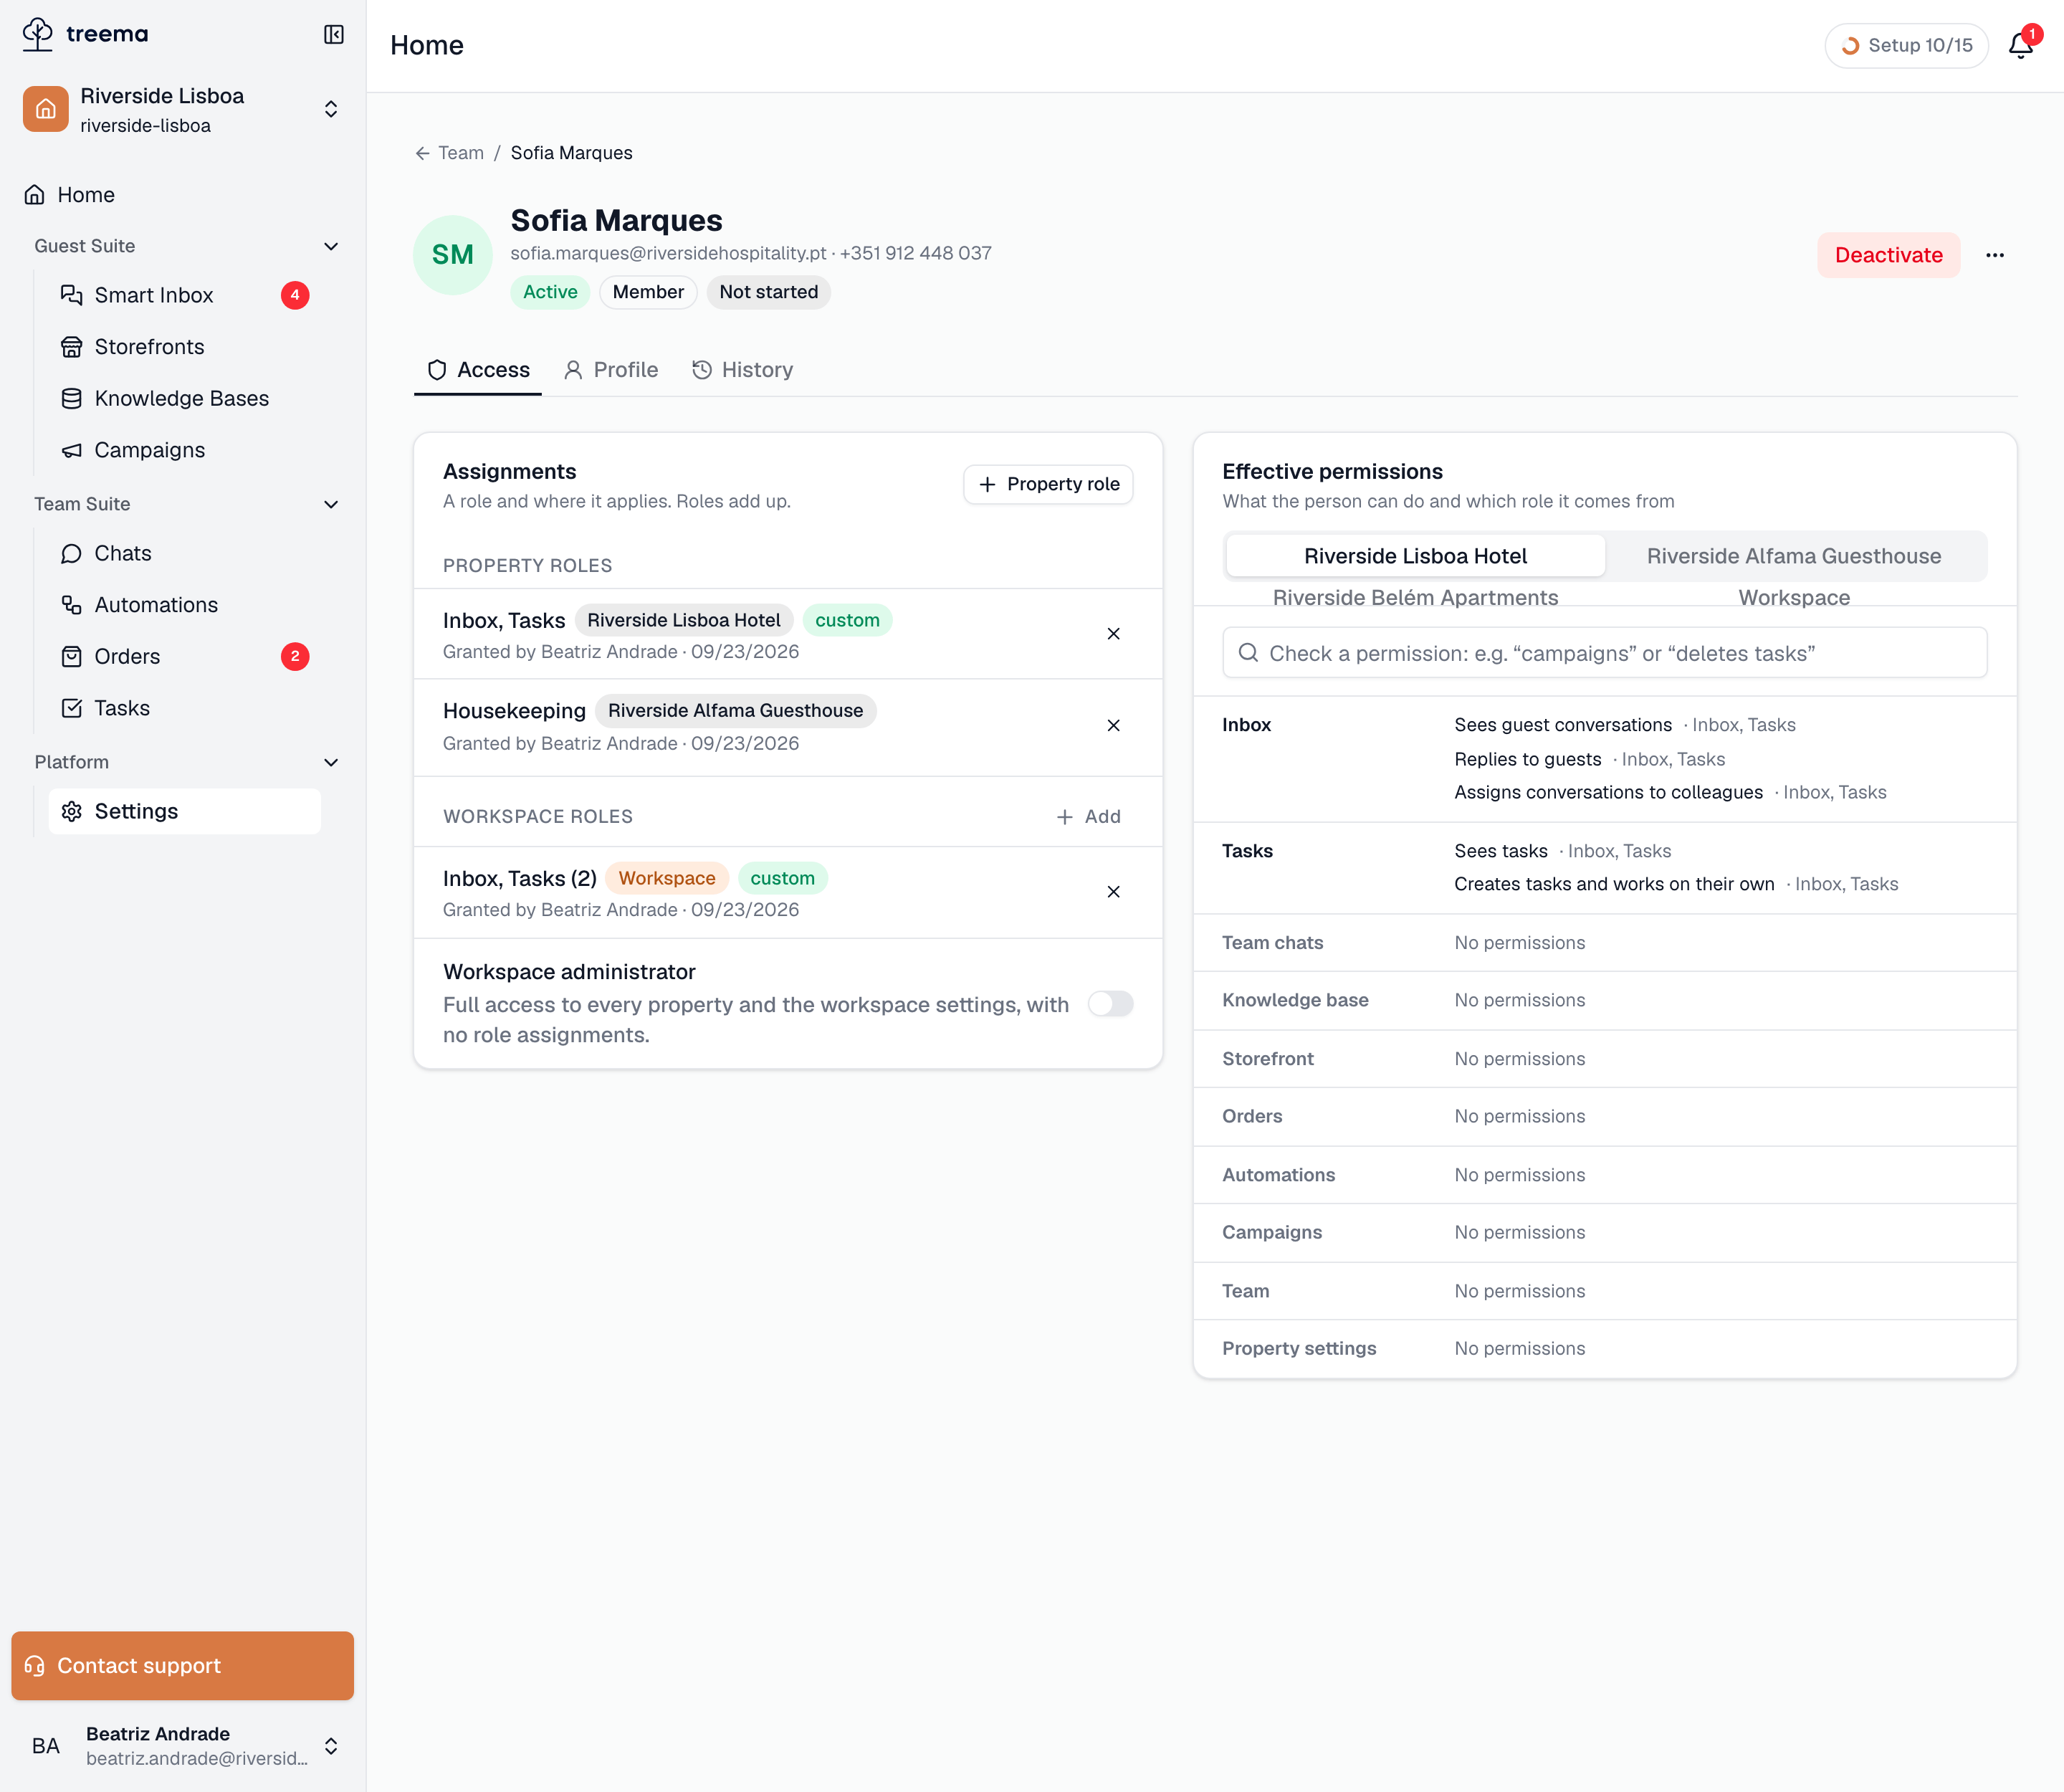
- 1
- 2
- Assignments — each role, where it applies, and who granted it
- Access permissions — what the person can actually do, and through which role
Assignments — "A role and where it applies. Roles add up." Under Property roles, one line per role: its name, a badge with the property (or All properties), a custom badge for a role that is not a preset, and "Granted by name · date" — or "System · date" for a grant no person made. The cross at the end removes the role; + Property role adds one, choosing Where — a property, or All properties, including new ones — and the role. Adding to all properties comes with a reminder: "The property role will apply in every property of the workspace, including new ones. It does not reach workspace-level objects."
Every add or remove is saved at once. After a removal, a note says what the person still has: "Role “Front desk” removed in “Riverside Lisboa Hotel”. Permissions kept from other roles: Sees tasks, Creates tasks and works on their own." — because roles add up, taking one away only removes what no other role grants.
Owners and admins also see Workspace roles here, with their own Add. An owner additionally gets the Workspace administrator switch — "Full access to every property and the workspace settings, with no role assignments." — which is how a member is made an admin, or an admin a member again.
Some pages are read-only, and say why:
- your own — "This is your access. You can’t change your own roles — a workspace administrator can.";
- the owner's — "The owner has full access to everything, and nobody can change it.";
- an admin's — "Workspace administrator — full access to every property, with no assignments."
Access permissions — "What the person can do and which role it comes from" — is the answer to "so what can they actually do?". Pick a property at the top (owners and admins also get Workspace), and the card lists every module with the permissions held there, each followed by the role it comes from; a permission held through two roles names both. Sensitive permissions carry a badge. A module the person cannot open says "No permissions".
The Check a permission box above it answers a single question: type "campaigns" or "deletes tasks" and it replies "Yes, in “Riverside Lisboa Hotel”. “Deletes tasks” — through “Hotel manager”." or "No, not in “Riverside Lisboa Hotel”. “Deletes tasks” is in none of the person’s roles here. Held in: Riverside Alfama Guesthouse." For an owner or admin it is always "Yes. … — full access covers everything."
Profile
First name, Last name, Phone and Save. The email is shown but locked — "The email can’t be changed." Only the workspace's owner and admins can edit a profile; anyone else sees the fields greyed with "Only a workspace administrator can edit the profile." A pending invitation's profile is what was typed into the invite: "The profile can be edited once the invitation is accepted."
History
Every access change concerning this person, newest first — the same entries as the change log, filtered to them: roles granted and removed, deactivations, the invitation itself. Show more loads older ones.
Activating and deactivating
Deactivating is how someone leaves: their account stops working while everything they did stays attached to their name, and their roles stay on record.
- Deactivate, on the person's page, is offered to the workspace's owner and admins for anyone except the owner and themselves — so nobody can lock the owner out, or themselves.
- A deactivated person stays in the table with a Deactivated badge, and Activate on their page brings them back with the same roles they had.
A property manager can deactivate only a member whose access lies entirely within the properties the manager runs. Someone who also works elsewhere gets a different button instead — Remove from “Riverside Lisboa Hotel” — which takes away every role in that property and leaves the rest untouched. The banner explains: "Name works in other properties of the workspace too. You can remove their roles only in “…”; only a workspace administrator can deactivate the person entirely."
Pending invitations
An invited person has a row like anyone else, with an Invited badge, and a page that says "This person hasn’t accepted the invitation yet. The roles can be changed until they do." — so a mistake in the invitation is corrected on the Access tab rather than by revoking and starting over. The header shows when the invitation expires, and offers:
- Resend — sends the invitation email again, for the address that swears it never arrived.
- Revoke invitation — cancels it. The link in the email stops working, and the row disappears.
An invitation sent as administrator has no roles to edit: "To change the level, revoke it and send a new one." An expired invitation's roles cannot be changed either — resend or revoke it.
Several people at once
Tick the boxes at the start of the rows (the owner's row has none) and a bar appears at the bottom — "Selected: n" — with:
- Grant role… — "The role is added to what they already hold — nothing is removed." Choose a property and a role; "The change applies immediately and lands in the change log."
- Remove from property… — "Every role they hold in that property is removed; their access elsewhere stays." A manager of one property gets the shorter Remove from “…”.
- Resend invites — for the selected pending invitations.
Rows the action cannot apply to are skipped, and the result says so: "you can’t change your own access", "owners and admins have full access and hold no roles", or "n invites — an invite’s access is edited on its own page". The result reads "Role granted to n of m".
Tracking who has actually started
A member's page header carries a badge showing how far they have got with their own Getting Started checklist, which is the fastest way to see who is genuinely up and running:
| Badge | What it means |
|---|---|
| Not started | The invitation was accepted but they have never opened the workspace. |
| Getting started n/n | They are working through the checklist. |
| Waiting for access | They can sign in, but there is nothing for them to work with yet — open their Access tab and give them a role. |
| Set up | Finished, or dismissed by them. |
| Waived · n/n | You excused them from the checklist; their real progress is still shown. |
Beside the actions, Send a reminder prompts them to pick the checklist back up — once a day, so it reads "Reminded in the last 24h" if you have already sent one — and Waive onboarding stops prompting an experienced hire who does not need the tour. Restore onboarding puts it back. Neither appears on your own page.